
“Add a reminder to my calendar for Friday.” → “I can’t access your calendar.” “Book me a cab to the airport.” → “I’m not able to do that.” “What’s my current account balance?” → “I don’t have access to your account.”
Notice the pattern. These aren’t things you can solve by searching the internet no Google result knows what’s on your calendar, and no web page can move money in your bank account or hail a cab to your door. The model isn’t missing information. It’s missing hands. It can talk about the whole world, but it can’t reach into yours and change anything in it.
That’s because a language model is like a brilliant person locked in a room with no phone and no door. They know an enormous amount, but they can’t touch anything outside that room. All they can do is talk.
An AI agent changes that. It’s what you get when you hand that brilliant person a phone and a set of keys, and say, “here now you can actually act.” Suddenly it can read your app’s private data, add that calendar event, book the cab, pay the bill reach into your world and get things done.
And MCP — the Model Context Protocol — is the thing that makes giving it those “keys” simple and standard. Instead of wiring up every tool and every account by hand for every model, you connect them through one common protocol. Build it once, and your Android app’s AI can plug into anything.
By the end of this article, you’ll understand exactly how that works and you’ll have the real Kotlin code to build it yourself. We’ll start from zero (what’s an agent? what’s MCP?) and climb step by step into the architecture, the “thinking” loop that powers every agent, working code with the official MCP SDK, a complete real-world example, and the security you can’t skip on a mobile device.
No prior agent experience needed. Let’s go.
Here’s the path:
- What is an AI agent, really?
- The problem MCP solves (and why you should care)
- MCP architecture: hosts, clients, servers, and primitives
- Where Android fits in the picture
- The agent loop the actual “thinking”
- Hands-on: building the MCP client in Kotlin
- Wiring tools into the LLM and running the loop
- A complete real-world example: a Smart Travel Assistant
- Security and production realities on mobile
- The on-device angle
- Summary
Let’s begin at the beginning.
1. What Is an AI Agent, Really?
Strip away the hype and an AI agent is surprisingly simple to define:
An AI agent is an LLM that can decide to take actions, take them, observe the results, and keep going until a goal is met.
Three ingredients make it an agent rather than a chatbot:
- A brain — the LLM that reasons and makes decisions.
- Tools — concrete actions it can perform (fetch data, call an API, update a record).
- A loop — the model doesn’t just answer once; it can call a tool, look at the result, decide what to do next, and repeat.
Picture a normal chatbot: you ask “What’s the weather in Delhi?”, and it says, more or less, “I don’t have access to real-time data.” That’s a brain with no hands.
Now picture an agent: you ask the same thing. The model thinks, “I need live weather. I have a get_weather tool. Let me call it with city = Delhi." It calls the tool, gets back 34°C, clear, and then replies: "It's 34°C and clear in Delhi right now." Same brain — but now it reached into the world, fetched a fact, and used it.
That ability to choose and call tools is the heart of agentic behavior. The only question left is: how do we give the model tools in a clean, standard, reusable way? That’s exactly the gap MCP fills.
2. The Problem MCP Solves (and Why You Should Care)
Before MCP, connecting an LLM to tools was a mess that engineers call the N × M problem.
Imagine you have N different AI models (Gemini, Claude, GPT, an on-device Gemma model) and M different tools or data sources (your REST API, a SQLite database, Google Calendar, a payments service). If every model needs custom integration code for every tool, you end up writing and maintaining N × M separate integrations. Add one new tool, and you have to wire it into every model. Add one new model, and you have to wire in every tool. It doesn’t scale.
MCP, an open standard introduced by Anthropic in late 2024 and now maintained as an open specification, collapses that into an N + M problem. Each model speaks MCP once. Each tool exposes itself over MCP once. They all interoperate through a single shared protocol. MCP standardises secure, two-way connections between AI applications and external tools, data sources, and services without custom per-integration code.
The analogy that stuck with the community is USB-C for AI. Before USB-C, every device had its own proprietary charger and cable. USB-C gave us one connector that works everywhere. MCP is that universal connector between AI models and the outside world — plug any compliant tool into any compliant model.
There’s a second, subtler reason this matters, especially against plain retrieval-augmented generation (RAG). RAG focuses on retrieving information to feed into the model’s prompt, whereas MCP enables both retrieval and action the model can read data and also write data through the same protocol. In short: RAG makes a model more knowledgeable; MCP makes it more capable. For an Android app, that’s the difference between an assistant that can tell you about your calendar and one that can actually add an event to it.
So MCP is the standard. Now let’s see how it’s actually structured.
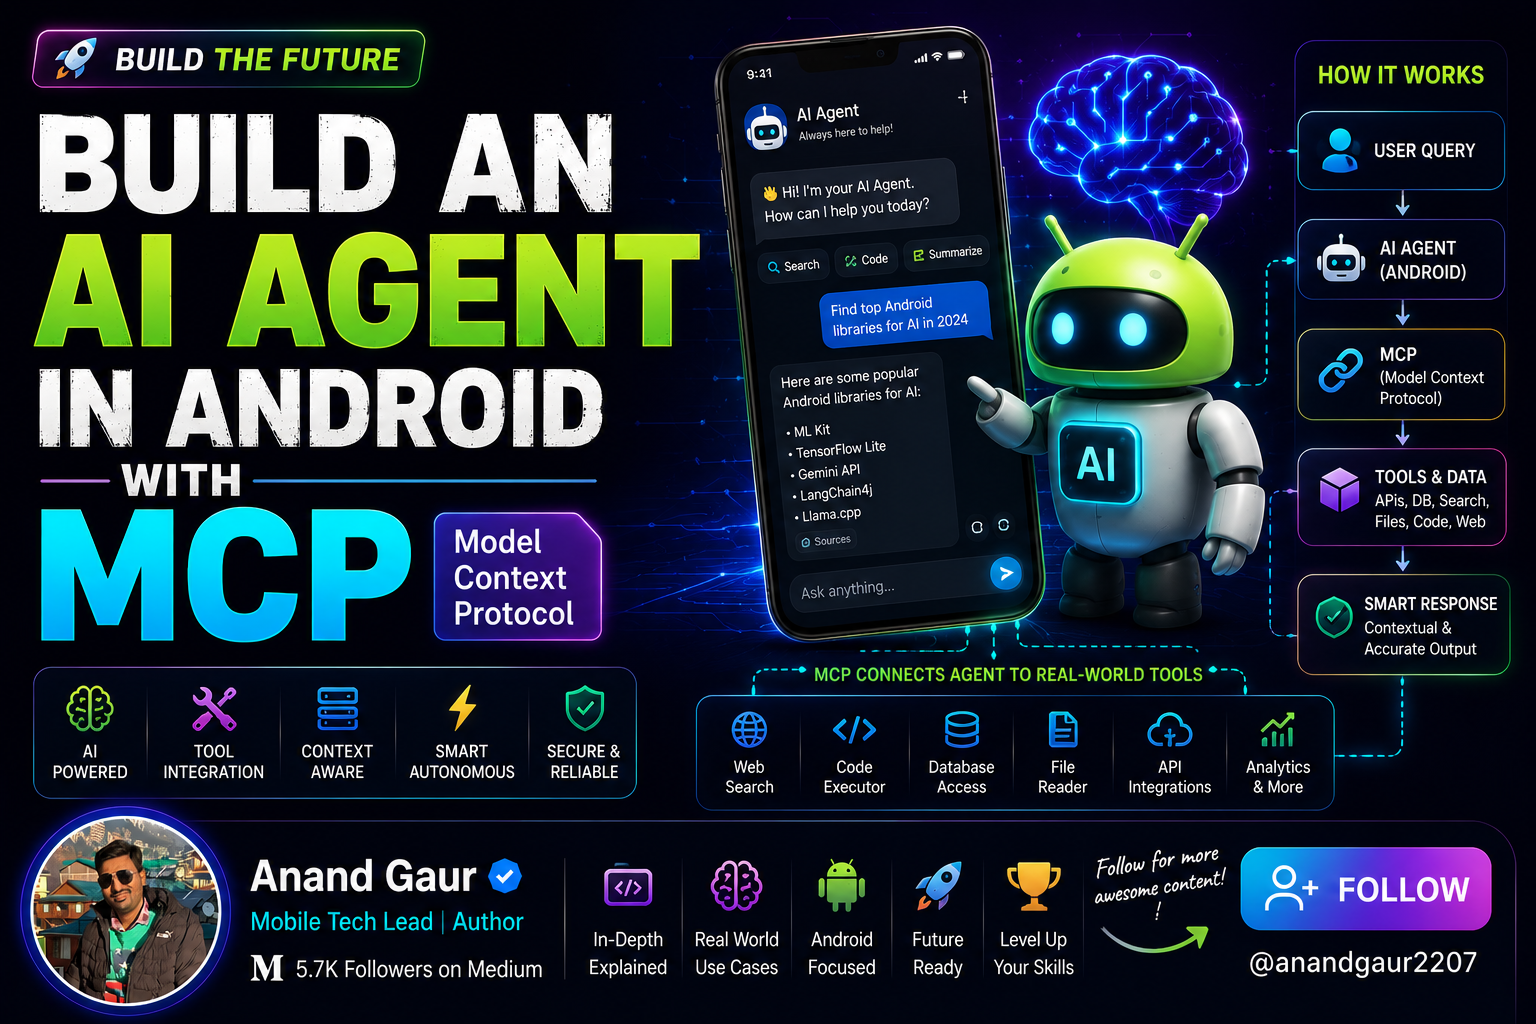
3. MCP Architecture: Hosts, Clients, Servers, and Primitives
MCP has three roles. Getting these clear in your head is 80% of understanding the whole protocol.
The Host is the AI application the user interacts with in our case, your Android app. The host contains the LLM (or talks to it) and orchestrates everything.
The Client lives inside the host. It’s the component that speaks the MCP protocol. Each client maintains a one-to-one connection to a single server. If your app talks to three different MCP servers, it runs three clients.
The Server is a program that exposes capabilities tools, data, prompts over MCP. A weather server, a calendar server, a database server. Servers can run locally or live remotely in the cloud.
The relationship is simple: Host contains Client(s); each Client connects to one Server.
Now, what does a server actually expose? MCP defines three core primitives:
- Tools — executable actions the model can invoke.
send_email,create_calendar_event,query_database. These do things and can change state. This is the primitive you'll use most when building agents. - Resources — read-only data the model can fetch. A file, a database row, a document. Resources are the safe, low-risk primitive they retrieve information but never change state.
- Prompts — reusable, parameterized templates that a user or app can select, like saved slash-commands or structured starter flows.
There are also client-side features worth knowing as you go deeper: sampling (a server can ask the host’s LLM to generate something), elicitation (a server can ask the user for more input mid-task), and roots (the client tells the server which parts of the filesystem or workspace it’s allowed to touch).
Under the hood, every MCP message is JSON-RPC 2.0 a simple, well-understood request/response format. Tool definitions are fully portable: the same tool description works whether the server runs on your machine or in the cloud.
Which brings us to transports — how the bytes actually travel. The current spec defines two:
- stdio — for local servers running as a child process on the same machine. The client writes to the process’s standard input and reads its standard output. Great for desktop and CLI tools.
- Streamable HTTP — for remote servers, over HTTPS, with server-sent events (SSE) for streaming responses back. This is how an app connects to a server running somewhere else on the network.
That distinction matters enormously for Android, so let’s address it head-on.
4. Where Android Fits in the Picture
Here’s the mental model for Android specifically, and it’s the part most tutorials gloss over:
Your Android app is the Host. It contains an MCP Client. That client connects to one or more MCP Servers which, for a phone, almost always live remotely and are reached over Streamable HTTP.
A phone is not a desktop. You’re generally not spawning local child processes and piping their stdin/stdout (the stdio transport’s home turf). Instead, your app holds an MCP client that reaches out over HTTPS to MCP servers running in the cloud your own backend, a third-party service, or a hosted tool provider. So on Android, Streamable HTTP is your default transport, and stdio is mostly something you’ll use in development or on the server side.
The good news for Android developers: there’s an official Kotlin SDK for MCP, built by Anthropic in collaboration with JetBrains. It’s a Kotlin Multiplatform library with first-class coroutine support, so it fits naturally into the way you already write Android code. It enables Kotlin applications to implement MCP clients and servers using a standardized protocol interface, and supports standard transports like stdio, SSE, Streamable HTTP, and WebSocket with coroutine-friendly APIs.
So the build has three conceptual layers in your app:
- The LLM layer — Gemini (via the API or Firebase AI Logic), or an on-device model like Gemma. This is the brain that decides which tools to call.
- The MCP client layer — the official Kotlin SDK, connecting to your servers and exposing their tools.
- The agent loop — your own orchestration code that ties the brain to the hands.
The first two are libraries. The third is the interesting part you write yourself, and it’s where the real understanding lives. Let’s open it up.
5. The Agent Loop — The Actual “Thinking”
This is the conceptual core. An agent isn’t a single request-response; it’s a loop. Here’s the full cycle, step by step:
- Discover. When the app starts, the MCP client connects to its servers and calls
tools/list. It gets back every tool's name, description, and input schema (what arguments it accepts). Your app now knows what the agent can do. - Describe to the model. You hand those tool definitions to the LLM as “function declarations” — telling the model, in its own language, “here are the tools available, here’s what each does, here are the parameters.”
- Ask. The user sends a request: “What’s the weather in Mumbai, and add a reminder to carry an umbrella if it’s raining.” You send this, plus the tool list, to the LLM.
- Decide. The LLM reasons and responds in one of two ways: either a final text answer, or a request to call one or more tools (e.g., “call
get_weatherwithcity = Mumbai"). This decision — which tool, what arguments — is made entirely by the model. - Execute. If the model asked for a tool, your code routes that request through the MCP client:
tools/callwith the name and arguments. The MCP server runs the actual logic and returns a result. - Observe and feed back. You take the tool’s result and send it back to the LLM, appended to the conversation. Now the model can see what happened.
- Repeat. The model looks at the result and decides again maybe it needs another tool (call
set_reminder), or maybe it now has everything it needs to answer. The loop continues until the model produces a final text response with no further tool calls. - Respond. That final text goes to the user.
Notice that the model is in the driver’s seat. It decides whether to use tools, which ones, in what order, and when it’s done. Your code is the faithful executor: it discovers tools, presents them, runs the calls the model requests, and feeds results back. MCP is the standard pipe through which steps 1 and 5 flow.
This loop is the same whether you have one tool or fifty, one server or ten. Once you build it, adding capability is just adding servers. That’s the payoff. Now let’s write it.
6. Hands-On: Building the MCP Client in Kotlin
Let’s get concrete. First, add the official Kotlin SDK to your module’s build.gradle.kts. (Always check Maven Central for the current version, since the SDK is evolving quickly.)
dependencies {
    // Official MCP Kotlin SDK (umbrella artifact — client + server APIs)
    implementation("io.modelcontextprotocol:kotlin-sdk:<latest-version>")

// Ktor client engine for the HTTP transport on Android
    implementation("io.ktor:ktor-client-okhttp:<ktor-version>")
    // Coroutines (you almost certainly already have this)
    implementation("org.jetbrains.kotlinx:kotlinx-coroutines-android:<version>")
}
Next, create an MCP client and connect it to your remote server. Because everything is coroutine-based, this all happens inside suspend functions — which fits beautifully with the structured concurrency you already use in Android.
import io.modelcontextprotocol.kotlin.sdk.Implementation
import io.modelcontextprotocol.kotlin.sdk.client.Client

class McpToolProvider {
    private lateinit var client: Client
    // Connect to a remote MCP server over Streamable HTTP.
    suspend fun connect(serverUrl: String) {
        client = Client(
            clientInfo = Implementation(
                name = "android-agent-client",
                version = "1.0.0"
            )
        )
        // Build an HTTP/SSE transport pointing at your server.
        // The exact transport constructor evolves with the SDK -
        // check the SDK README for the current factory for Streamable HTTP.
        val transport = buildHttpTransport(serverUrl)
        // The handshake: negotiates protocol version and exchanges capabilities.
        client.connect(transport)
    }
}
That connect call performs the MCP handshake the client and server agree on a protocol version and tell each other what they support. After it returns, you have a live connection.
Now, discovery — ask the server what tools it offers:
suspend fun discoverTools(): List<ToolInfo> {
    val response = client.listTools()  // the MCP `tools/list` call

return response.tools.map { tool ->
        ToolInfo(
            name = tool.name,
            description = tool.description ?: "",
            inputSchema = tool.inputSchema  // JSON Schema describing arguments
        )
    }
}
data class ToolInfo(
    val name: String,
    val description: String,
    val inputSchema: Any?
)
And execution — actually run a tool the model asked for:
import io.modelcontextprotocol.kotlin.sdk.CallToolRequest
import kotlinx.serialization.json.JsonObject

suspend fun callTool(name: String, arguments: JsonObject): String {
    val result = client.callTool(
        CallToolRequest(name = name, arguments = arguments)
    )
    // Tool results come back as content blocks (usually text).
    // Flatten them into a single string to hand back to the LLM.
    return result?.content
        ?.filterIsInstance<io.modelcontextprotocol.kotlin.sdk.TextContent>()
        ?.joinToString("\n") { it.text ?: "" }
        ?: "Tool returned no content."
}
That’s the entire MCP-facing surface you need for a working agent: connect, list, call. Three operations. Everything else is orchestration.
7. Wiring Tools into the LLM and Running the Loop
Now we connect the hands (MCP tools) to the brain (the LLM we’ll use Gemini, since it’s a natural fit on Android via the API or Firebase AI Logic).
The bridge is function declarations. Gemini, like most modern models, accepts a list of available functions, each with a name, description, and parameter schema which is exactly what tools/list gave us. So we translate MCP tool definitions into the model's function-declaration format:
fun ToolInfo.toFunctionDeclaration(): FunctionDeclaration {
    return FunctionDeclaration(
        name = name,
        description = description,
        parameters = convertJsonSchemaToParams(inputSchema)
    )
}
Then we build the agent loop itself. This is the orchestration code from section 5, made real:
class Agent(
    private val mcp: McpToolProvider,
    private val llm: GenerativeModel  // configured with the tool declarations
)
{
suspend fun run(userMessage: String): String {
        // The running conversation the model sees.
        val conversation = mutableListOf<Content>()
        conversation.add(userContent(userMessage))
        // The loop. We cap iterations so a confused model can't spin forever.
        repeat(MAX_STEPS) {
            val response = llm.generateContent(*conversation.toTypedArray())
            val functionCalls = response.functionCalls
            if (functionCalls.isEmpty()) {
                // No tool requested - the model has its final answer.
                return response.text ?: "I couldn't produce a response."
            }
            // The model asked for one or more tools. Run them via MCP.
            conversation.add(response.candidates.first().content)
            for (call in functionCalls) {
                val toolResult = mcp.callTool(
                    name = call.name,
                    arguments = call.args.toJsonObject()
                )
                // Feed the result back so the model can reason about it.
                conversation.add(functionResultContent(call.name, toolResult))
            }
            // Loop again: the model now sees the results and decides next move.
        }
        return "Stopped after $MAX_STEPS steps without a final answer."
    }
    companion object { const val MAX_STEPS = 6 }
}
Walk through it against the eight-step loop from earlier and you’ll see every step:
- We send the conversation to the model (Ask).
- The model either returns text (Respond — we’re done) or function calls (Decide).
- For each function call, we run it through MCP (Execute) and append the result (Observe and feed back).
- We loop (Repeat), letting the model chain tools check weather, then set a reminder until it’s satisfied.
The MAX_STEPS cap is a small but important safety rail: agents can occasionally get into loops, and on a battery-powered, data-metered device you never want an unbounded loop hammering your servers. Always bound it.
That’s a complete, functioning agent. Let’s see it work on something real.
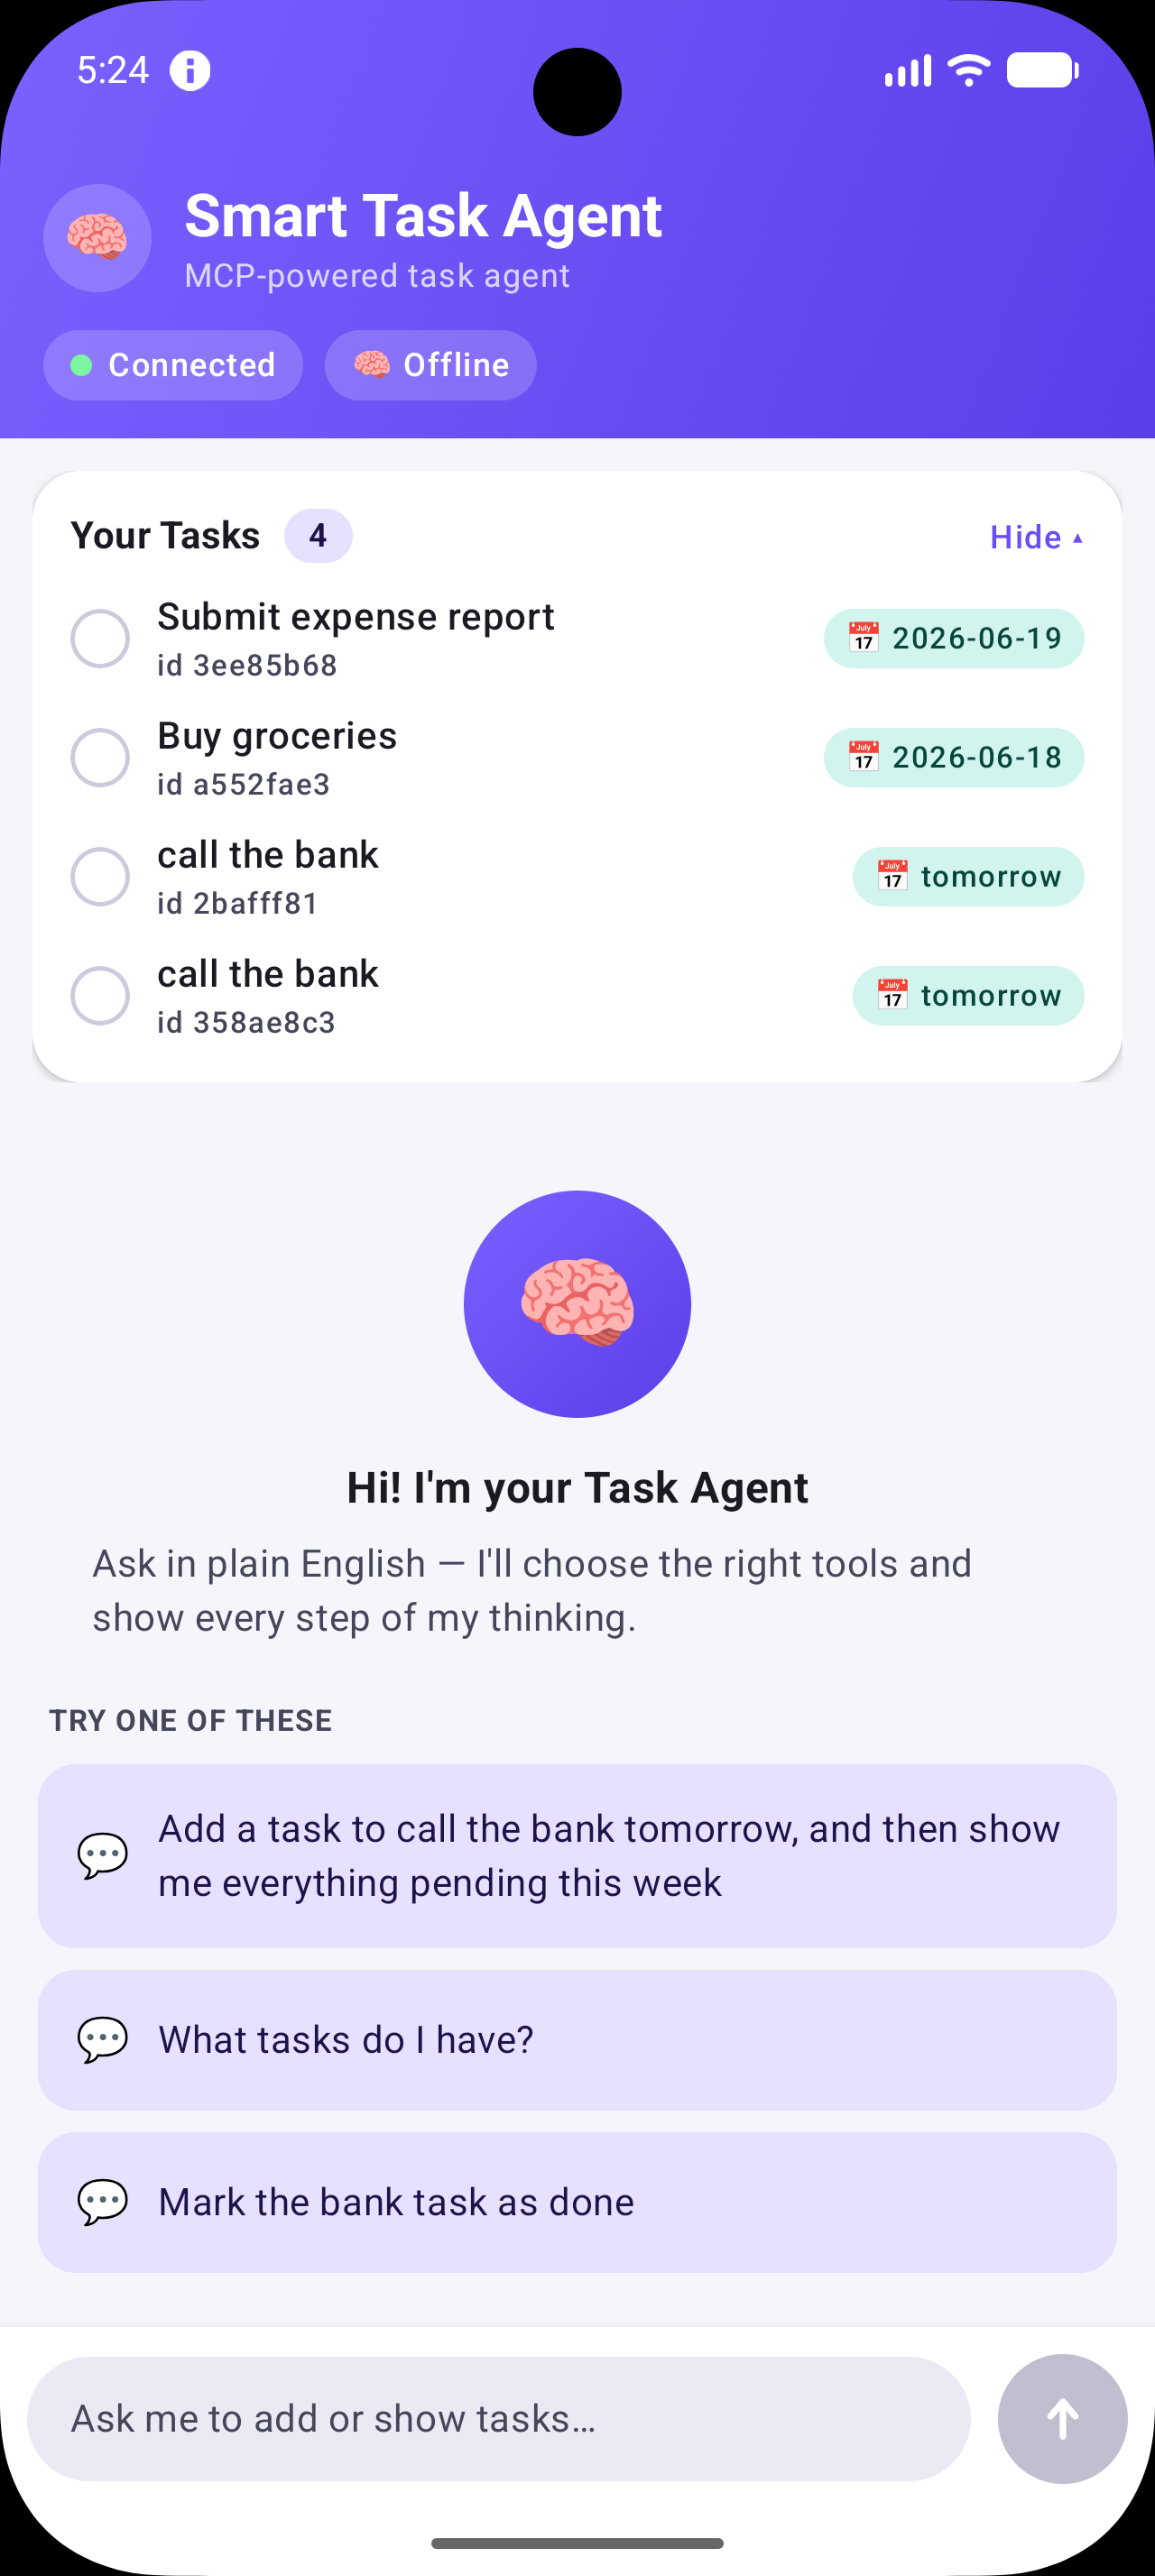
8. A Complete Real-World Example: A Smart Travel Assistant
Imagine an Android travel app. You expose a remote MCP server with three tools:
search_flights(origin, destination, date)— queries a flight API.get_weather(city, date)— fetches a forecast.add_to_itinerary(item, date)— writes into the user's saved trip in your backend.
The user opens your app and types:
“I’m flying from Delhi to Goa next Friday. Find me a morning flight, check if I’ll need a raincoat, and save the flight to my itinerary.”
Here’s the agent loop in action, step by step:
Step 1 — The model reads the request and the tool list. It recognizes three sub-tasks and a sensible order. It decides to call search_flights first, with origin = Delhi, destination = Goa, date = next Friday's date.
Step 2 — Your code runs it via MCP. The search_flights tool hits the flight API on the server and returns three morning options. The result flows back to the model.
Step 3 — The model observes the flights and picks the 7:40 AM option to present. But it remembers the raincoat question, so it now calls get_weather with city = Goa, date = next Friday.
Step 4 — MCP returns the forecast: light rain expected. Back to the model.
Step 5 — The model now has enough for the raincoat advice, and the user also asked to save the flight. So it calls add_to_itinerary with the chosen 7:40 AM flight.
Step 6 — MCP confirms the write. The model sees success.
Step 7 — No more tools needed. The model produces its final answer:
“I found a 7:40 AM IndiGo flight from Delhi to Goa next Friday and saved it to your itinerary. Pack a raincoat — light rain is expected in Goa that day.”
Three tools, four tool calls, one fluid loop, and a genuinely useful result. The user typed one sentence; the agent reasoned, fetched live data from two sources, performed a write to their account, and answered naturally.
Critically, notice what you built: a server exposing three tools, and a generic agent loop. You never hard-coded the sequence “flights then weather then save.” The model figured out the plan. If tomorrow you add a book_hotel tool to the server, the same agent can use it with zero changes to the loop. That's the leverage MCP gives you.
9. Security and Production Realities on Mobile
This is where a responsible Android engineer slows down. An agent can take actions — including actions that cost money, send messages, or modify user data. On a personal device holding personal data, that demands a serious security posture. A few non-negotiables:
Human-in-the-loop for consequential actions. Never let the agent silently send_payment or delete_account. For any tool that changes important state, surface a confirmation to the user before executing the call. MCP's design anticipates this — sampling and elicitation primitives exist precisely to keep a human in control of high-stakes steps.
Proper authorization. Modern MCP treats servers as protected resources with real auth. The March 2025 update introduced a comprehensive OAuth 2.1-based authorization framework, treating MCP servers as protected OAuth resource servers capable of robust token-based security. More recent revisions tightened this further. The June 2025 update classifies MCP servers as OAuth resource servers and requires clients to implement Resource Indicators (RFC 8707), which prevents a malicious server from obtaining tokens meant for a different server. On Android, this means storing tokens securely (EncryptedSharedPreferences or the Keystore), never embedding long-lived secrets in the APK, and scoping each token tightly.
Trust the server, but verify. A tool description is text that gets fed to your LLM. A malicious or compromised server could try to manipulate the model through crafted descriptions (a class of attack known as prompt injection). Only connect to MCP servers you control or genuinely trust, validate tool outputs before acting on them, and treat anything coming back from a tool as untrusted input.
Mind the device. Phones have limited battery, metered data, and intermittent connectivity. Bound your agent loops (the MAX_STEPS rail), handle network failures gracefully, cache tool lists where it's safe to (newer spec revisions even let servers signal how long a tools/list response stays fresh), and run the whole thing inside a lifecycle-aware scope like viewModelScope so it cancels cleanly when the user leaves the screen.
Validate before you write. Read-only tools (Resources) are low-risk. State-changing Tools deserve scrutiny — validate arguments, enforce server-side permission checks, and assume the model can occasionally produce wrong or unexpected arguments.
Security isn’t a final chapter you bolt on; with agents it’s part of the design from line one.
10. The On-Device Angle
Everything above used a cloud LLM (Gemini) and remote MCP servers. But you can push the brain onto the device too. With on-device models like Gemma running through MediaPipe LLM Inference or similar runtimes, the reasoning happens locally private, offline-capable, with no per-token cost.
The architecture barely changes. The on-device model takes the role of the brain in the agent loop; your MCP client still discovers and calls tools the same way. You can even mix: an on-device model handles routine reasoning and private data, while certain heavy tools live on remote MCP servers. The beauty of building against a standard protocol is that swapping the brain cloud to on-device, one model to another doesn’t force you to rewrite your tool integrations. That’s the N + M promise paying off again.
On-device tool calling is still maturing and smaller models are less reliable at complex multi-step tool selection than frontier cloud models, so for now a hybrid approach often gives the best of both worlds: local privacy where it counts, cloud capability where the task is hard.
Complete Source code here
https://github.com/anandgaur22/SmartTaskAgent
Summary
Let’s collapse the whole journey into a mental model you can carry into your next project:
- An AI agent is an LLM with tools and a loop: it decides on actions, takes them, observes results, and continues until the goal is met.
- MCP is the universal connector — USB-C for AI — that lets any compliant model use any compliant tool, turning the N × M integration nightmare into a clean N + M.
- The architecture is three roles: a Host (your Android app) containing Client(s), each connected to a Server that exposes Tools, Resources, and Prompts over JSON-RPC.
- On Android, your app is the host, you embed the official Kotlin MCP SDK as the client, and you reach remote servers over Streamable HTTP.
- The magic is the agent loop you write: discover tools → describe them to the model → let the model decide → execute via MCP → feed results back → repeat → answer.
- The MCP surface is tiny — connect, list, call — and the model does the planning.
- Security is foundational, not optional: human-in-the-loop for consequential actions, OAuth-based auth, trusted servers only, bounded loops, and lifecycle-aware scopes.
The big shift in thinking is this: you’re no longer building features one API call at a time. You’re giving a reasoning engine a toolbox and letting it figure out how to combine those tools to serve the user. Your job becomes exposing good tools and orchestrating a safe loop — and MCP is the standard that makes those tools portable, reusable, and future-proof.
The next time you write client.callTool(...) inside your agent loop, you'll know exactly what's happening: a brain in a sealed room just reached through a universal connector and touched the real world — on a phone, in your user's hand.
That’s how you build an AI agent in Android with MCP.
If this helped MCP and agents finally click for you, follow along for more deep-dives into Android, on-device AI, and modern mobile architecture.
If this guide helped you, save it, share it with a friend who’s job-hunting, and bookmark it for the night before your interview. Good luck — go get that offer.
Level Up Your Mobile Developer Interview !
Mastering AI for Android Developers
Your complete hands-on guide to integrating AI into Android apps — covering Generative AI, LLMs, on-device intelligence, AI APIs, real-world use cases, and practical implementation with modern Android development.
👉 Grab your copy now:
https://medium.com/@anandgaur2207/mastering-ai-for-android-developers-5cc6d62e7d21
Cracking the Mobile System Design Interview Book
Your complete practical guide to mastering Mobile System Design Interviews — covering scalable architecture, Android & iOS system design concepts, high-level design strategies, low-level design patterns, performance optimization, offline-first architecture, real-world case.
👉 Grab your copy now:
https://medium.com/@anandgaur2207/cracking-the-mobile-system-design-interview-book-8ff043db0359
Crack Android Interviews Like a Pro
Your complete Android interview preparation book — packed with real questions, deep explanations, and practical insights to help you stand out.
👉 Grab your copy now:
https://medium.com/@anandgaur2207/crack-android-interviews-with-confidence-the-only-handbook-youll-need-b87ec525f19c
iOS Developer Interview Handbook
From Swift fundamentals to advanced iOS concepts — a complete handbook to help you prepare smartly and confidently.
👉 Explore the book:
https://medium.com/@anandgaur2207/crack-ios-developer-interviews-with-confidence-the-complete-ios-developer-handbook-f1eabc3d7a21
Flutter Developer Interview Handbook
Ace your next Flutter interview with scenario-based questions, detailed explanations, and hands-on examples that make you stand out.
👉 Explore the book:
https://medium.com/@anandgaur2207/crack-flutter-developer-interviews-with-confidence-the-complete-flutter-developer-interview-6cb53996832c
React Native Developer Interview Handbook
Crack your next React Native interview with confidence!
This guide is packed with scenario-based questions, detailed explanations, and hands-on examples to help you stand out and succeed.
👉 Explore the book:
https://medium.com/@anandgaur2207/react-native-interview-crack-your-next-interview-with-confidence-0d7255a20fe1
Need 1:1 Career Guidance or Mentorship?
If you’re looking for personalized guidance, interview preparation help, or just want to talk about your career path in mobile development — you can book a 1:1 session with me on Topmate.
I’ve helped many developers grow in their careers, switch jobs, and gain clarity with focused mentorship. Looking forward to helping you too!
Found this helpful? Don’t forgot to clap 👏 and follow me for more such useful articles about Android development and Kotlin or buy us a coffee here ☕
If you need any help related to Mobile app development. I’m always happy to help you.
Follow me on: